Physical Address
304 North Cardinal St.
Dorchester Center, MA 02124
Physical Address
304 North Cardinal St.
Dorchester Center, MA 02124


Hey makers! Have you ever built a basic robot car and wished it could do something cooler than just moving forward and backward?
How about a robot that can move sideways, diagonally, or spin around in place? That’s exactly what Mecanum wheels let your robot do! These special wheels have small angled rollers that allow your robot to move smoothly in any direction, not just straight. Pretty awesome, right?
Unlike regular wheels, Mecanum wheels have rollers set at a 45-degree angle around their rim, enabling omnidirectional movement. This means your robot isn’t limited to just straight paths—it can navigate tight spaces, drift sideways effortlessly, and offer a completely new level of control and fun!
Today, I’ll guide you through building your own Arduino-powered Mecanum wheels robot. Ready to explore the exciting world of omnidirectional robotics? Let’s dive in.
Mecanum wheels aren’t like regular wheels. Instead of just rolling forward or backward, each Mecanum wheel has a bunch of angled rollers set at 45 degrees around the rim. This setup allows for some wild motion:

These wheels were invented way back in 1973 by a Swedish engineer named Bengt Ilon, and they’ve become popular in robotics competitions, warehouse robots, and places where tight maneuvering is a must.

Here’s your quick shopping list:
This post may contain affiliate links. If you purchase through these links, I may earn a small commission at no extra cost to you. It helps support this blog and keeps the projects coming—thanks for your support!
Before jumping into the build process, make sure you have all the required components, such as the metal chassis, Mecanum wheels, L293D motor driver, and other items listed above.
Now let’s get building!

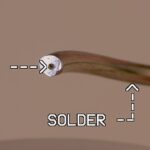
First things first—let’s solder wires to all four motors.
If you got motors that already come pre-wired, feel free to skip this step. But if not—or if you haven’t picked up a soldering iron yet—it might be time to grab one. Trust me, it’s a solid investment if you’re into DIY stuff.

Personally, I’m using the Hakko 936 right now and it’s been doing a great job. If you’re looking for something similar, I’ll drop an Amazon link with a few good options I’d recommend.

When soldering, don’t worry too much about the motor polarity just yet. Just solder two wires to each motor. If one spins the wrong way later, you can simply swap the wires around. Easy fix!
Next up, let’s install the four motors onto the chassis using eight M3x45 screws. It’s a pretty simple step—just align everything properly, slide in the bolts and nuts, and tighten them up. If you’ve got a power screwdriver, this is where it shines (your wrists will thank you). But don’t worry if you’re doing it by hand—it works just fine too.

Once the motors are in place, go ahead and mount all four Mecanum wheels. Boom—your robot’s frame is officially coming together! It might not move yet, but it already looks like it’s ready to roll, right?
Using a power screwdriver can save your wrists a lot of pain.
I personally use this one → [link]

If you’re not sure how to position them correctly, just scroll back to the top of the page and check the reference image.
Now it’s time to mount the Arduino board onto the chassis using four M3x10 female-to-female standoffs. This step is mostly for keeping things neat and organized—though if you’re in a rush, a bit of hot glue can do the trick too. Just tighten the standoffs with a screwdriver and you’re all set.

Once that’s done, go ahead and connect the motor driver directly to your Arduino Uno R3. It’s a really straightforward plug-in. And if you’re unsure about the setup, don’t worry—I’ve made a video walkthrough for this step, so feel free to check it out for a visual guide.

Now we’re moving on to wiring everything up—so pay extra attention here! Especially when it comes to power polarity. Mixing up VCC and GND is the fastest way to fry your board, and no one wants to order a new Arduino just because of one careless moment.

For the motors:
As I mentioned earlier, if the car moves in reverse, just swap the motor wires to fix the direction. Easy fix.
That wraps up the motor section—now let’s hook up the Bluetooth module (HC-05) to the Arduino Board.

The HC-05 is a Bluetooth module commonly used with Arduino for wireless communication. It allows your Arduino to communicate wirelessly with smartphones, computers, or other Bluetooth devices.
The HC-05 has four pins:

⚠️ Important: The HC-05 uses 3.3V logic on RX, while Arduino pins are 5V. Some people risk it, some use a voltage divider—just know the risk and proceed accordingly
Carefully connect your Li-ion battery (between 7.4V and 12V) to the motor driver. Always double-check polarity:
A reverse connection here could burn your driver or board, so take a minute to verify everything.
You can check the code and download the APK file here.
Mecanum Wheels Robot Code Explanation
#include <SoftwareSerial.h>
#include <Wire.h>
#include <AFMotor.h>
SoftwareSerial Bluetooth(9, 10); // Arduino(RX, TX) - HC-05 Bluetooth (TX, RX)
AF_DCMotor motor(1, MOTOR12_64KHZ);
AF_DCMotor motor1(2, MOTOR12_64KHZ);
AF_DCMotor motor2(3, MOTOR12_64KHZ);
AF_DCMotor motor3(4, MOTOR12_64KHZ);
int wheelSpeed=100;
int dataIn, m;
void setup() {

  Serial.begin(9600);
  Bluetooth.begin(9600);
  Bluetooth.setTimeout(1);
  delay(20);
}
void loop() {
  // Check for incoming data
  if (Bluetooth.available() > 0) {
    dataIn = Bluetooth.read();  // Read the data
    Serial.println(dataIn);
    if (dataIn == 0) {
      m = 0;
    }
    if (dataIn == 1) {
      m = 1;
    }
    if (dataIn == 2) {
      m = 2;
    }
    if (dataIn == 3) {
      m = 3;
    }
    if (dataIn == 4) {
      m = 4;
    }
    if (dataIn == 5) {
      m = 5;
    }
    if (dataIn == 6) {
      m = 6;
    }
    if (dataIn == 7) {
      m = 7;
    }
    if (dataIn == 8) {
      m = 8;
    }
    if (dataIn == 9) {
      m = 9;
    }
    if (dataIn == 10) {
      m = 10;
    }
    if (dataIn == 11) {
      m = 11;
    }
    if (dataIn == 12) {
      m = 12;
    }
    if (dataIn == 14) {
      m = 14;
    }
    // Set speed
    if (dataIn >= 16) {
      wheelSpeed = dataIn;
      Serial.println(wheelSpeed);
    }
  }
  if (m == 5) {
    moveSidewaysLeft();
  }
  if (m == 4) {
    moveSidewaysRight();
  }
  if (m == 2) {
    moveForward();
  }
  if (m == 7) {
    moveBackward();
  }
  if (m == 1) {
    moveRightForward();
  }
  if (m == 3) {
    moveLeftForward();
  }
  if (m == 6) {
    moveRightBackward();
  }
  if (m == 8) {
    moveLeftBackward();
  }
  if (m == 9) {
    rotateLeft();
  }
  if (m == 10) {
    rotateRight();
  }
  if (m == 0) {
    stopMoving();
  }
  //Serial.println(dataIn);
  // If button "SAVE" is pressed
  if (m == 12) {

  }


}

void moveForward() {

  motor.setSpeed(wheelSpeed);
  motor1.setSpeed(wheelSpeed);
  motor2.setSpeed(wheelSpeed);
  motor3.setSpeed(wheelSpeed);
  motor1.run(FORWARD);
   motor.run(FORWARD);
   motor3.run(FORWARD);
 motor2.run(FORWARD);
}
void moveBackward() {

  motor.setSpeed(wheelSpeed);
  motor1.setSpeed(wheelSpeed);
  motor2.setSpeed(wheelSpeed);
  motor3.setSpeed(wheelSpeed);
  motor1.run(BACKWARD);
   motor.run(BACKWARD);
   motor3.run(BACKWARD);
 motor2.run(BACKWARD);
}
void moveSidewaysRight() {

  motor.setSpeed(wheelSpeed);
  motor1.setSpeed(wheelSpeed);
  motor2.setSpeed(wheelSpeed);
  motor3.setSpeed(wheelSpeed);
  motor1.run(BACKWARD);
   motor.run(FORWARD);
   motor3.run(BACKWARD);
 motor2.run(FORWARD);
}
void moveSidewaysLeft() {

  motor.setSpeed(wheelSpeed);
  motor1.setSpeed(wheelSpeed);
  motor2.setSpeed(wheelSpeed);
  motor3.setSpeed(wheelSpeed);
  motor1.run(FORWARD);
   motor.run(BACKWARD);
   motor3.run(FORWARD);
 motor2.run(BACKWARD);
}
void rotateLeft() {

  motor.setSpeed(wheelSpeed);
  motor1.setSpeed(wheelSpeed);
  motor2.setSpeed(wheelSpeed);
  motor3.setSpeed(wheelSpeed);
motor1.run(FORWARD);
   motor.run(FORWARD);
   motor3.run(BACKWARD);
 motor2.run(BACKWARD);
}
void rotateRight() {

  motor.setSpeed(wheelSpeed);
  motor1.setSpeed(wheelSpeed);
  motor2.setSpeed(wheelSpeed);
  motor3.setSpeed(wheelSpeed);
  motor1.run(BACKWARD);
   motor.run(BACKWARD);
   motor3.run(FORWARD);
 motor2.run(FORWARD);
}
void moveRightForward() {

  motor.setSpeed(wheelSpeed);
  motor1.setSpeed(0);
  motor2.setSpeed(wheelSpeed);
  motor3.setSpeed(0);
  motor3.run(RELEASE);
   motor1.run(RELEASE);
   motor.run(FORWARD);
   motor2.run(FORWARD);
}
void moveRightBackward() {

  motor1.setSpeed(wheelSpeed);
  motor.setSpeed(0);
  motor3.setSpeed(wheelSpeed);
  motor2.setSpeed(0);
  motor.run(RELEASE);
   motor2.run(RELEASE);
   motor1.run(BACKWARD);
   motor3.run(BACKWARD);

}
void moveLeftForward() {

  motor.setSpeed(0);
  motor1.setSpeed(wheelSpeed);
  motor2.setSpeed(0);
  motor3.setSpeed(wheelSpeed);
  motor2.run(RELEASE);
   motor.run(RELEASE);
   motor1.run(FORWARD);
   motor3.run(FORWARD);
}
void moveLeftBackward() {

  motor.setSpeed(wheelSpeed);
  motor1.setSpeed(0);
  motor2.setSpeed(wheelSpeed);
  motor3.setSpeed(0);
  motor3.run(RELEASE);
   motor1.run(RELEASE);
   motor.run(BACKWARD);
   motor2.run(BACKWARD);
}
void stopMoving() {
  motor.run(RELEASE);
   motor1.run(RELEASE);
   motor2.run(RELEASE);
   motor3.run(RELEASE);
   motor1.setSpeed(0);
   motor2.setSpeed(0);
   motor3.setSpeed(0);
   motor.setSpeed(0);
}
#include <SoftwareSerial.h>
#include <Wire.h>
#include <AFMotor.h>
SoftwareSerial.h: Allows you to create a software-based serial port (for Bluetooth communication).<strong>Wire.h</strong>: Enables I2C communication (not used directly here, may be from a library dependency).<strong>AFMotor.h</strong>: Part of the Adafruit Motor Shield library, used to control DC motors easily.
SoftwareSerial Bluetooth(9, 10); // (RX, TX)
AF_DCMotor motor(1, MOTOR12_64KHZ);
AF_DCMotor motor1(2, MOTOR12_64KHZ);
AF_DCMotor motor2(3, MOTOR12_64KHZ);
AF_DCMotor motor3(4, MOTOR12_64KHZ)
MOTOR12_64KHZ sets the PWM frequency.
int wheelSpeed = 100;
int dataIn, m;
wheelSpeed: Speed value (0–255) for all motors.dataIn: Stores the latest value received via Bluetooth.m: Represents the current movement mode based on dataIn.
void setup() {
  Serial.begin(9600);
  Bluetooth.begin(9600);
  Bluetooth.setTimeout(1);
  delay(20);
}
setTimeout(1) defines how long to wait for serial data.
if (Bluetooth.available() > 0) {
  dataIn = Bluetooth.read();  // Read data from phone/app
  Serial.println(dataIn);
dataIn.
// Assigns received value to m (movement mode)
if (dataIn == 0) m = 0;
if (dataIn == 1) m = 1;
...
if (dataIn == 14) m = 14;
m).
if (dataIn >= 16) {
  wheelSpeed = dataIn;
  Serial.println(wheelSpeed);
}
16 or above, it’s treated as a speed value.
if (m == 5) moveSidewaysLeft();
if (m == 4) moveSidewaysRight();
if (m == 2) moveForward();
...
if (m == 10) rotateRight();
if (m == 0) stopMoving();
mThe robot executes a specific movement function.All movement functions follow this pattern:
FORWARD, BACKWARD, or RELEASE)
void moveForward() {
  set all motors to `wheelSpeed` and `FORWARD`
}
void moveBackward() {
  set all motors to `wheelSpeed` and `BACKWARD`
}
void moveSidewaysRight() {
  motors 1 and 3: BACKWARD
  motors 2 and 4: FORWARD
  → This creates a right slide motion
}
void moveSidewaysLeft() {
  motors 1 and 3: FORWARD
  motors 2 and 4: BACKWARD
  → This creates a left slide motion
}
// rotateLeft():
motors 1 and 2: FORWARD
motors 3 and 4: BACKWARD

// rotateRight():
motors 1 and 2: BACKWARD
motors 3 and 4: FORWARD

→ Creates a spin movement around the robot’s center
// moveRightForward():
Only motors 1 and 3 are OFF
motors 2 and 4 run FORWARD

// moveLeftForward():
Only motors 2 and 4 are ON (FORWARD)

→ Creates diagonal movement by controlling motor pairs
void stopMoving() {
  all motors set to RELEASE
  all speeds set to 0
}
 if (m == 12) {
  // Reserved for SAVE function (not implemented yet)
}| Problem | Solution |
|---|---|
| The robot is not moving at all | Check the battery and power wires |
| Motors are spinning but in the wrong direction | Reverse motor wires |
| Robot drifts or moves oddly | Check wheel orientation |
| Bluetooth not pairing | Recheck TX/RX pins and baud rate |
Boom! You’ve just built your own Arduino-powered Mecanum robot. Whether you’re doing this for fun, as a school project, or for a robotics competition, this is a great hands-on way to elevate your maker skills.
Next steps you can try:
Thanks for reading, and happy building! If you made it this far, you’re already ahead of most hobbyists. Keep experimenting—and don’t forget to share your robot with the world.