Want to visualize how close something is using just LEDs? In this project, we’ll use an HC-SR04 ultrasonic sensor to light up a row of LEDs based on distance — the closer the object gets, the more LEDs light up. We’ll also display the measured distance on a 16×2 I2C LCD screen.
Components Required
- Arduino Uno Starter Kit
- Bread Board
- Jumper Wires
- 5mm LEDs Assortment Pack
- Resistors ( 220 ohms recommended)
- TM36 Temperature Sensor
- 16×2 I2C LCD Display
- Ultrasonic Sensors
This post may contain affiliate links. If you purchase through these links, I may earn a small commission at no extra cost to you. It helps support this blog and keeps the projects coming—thanks for your support!
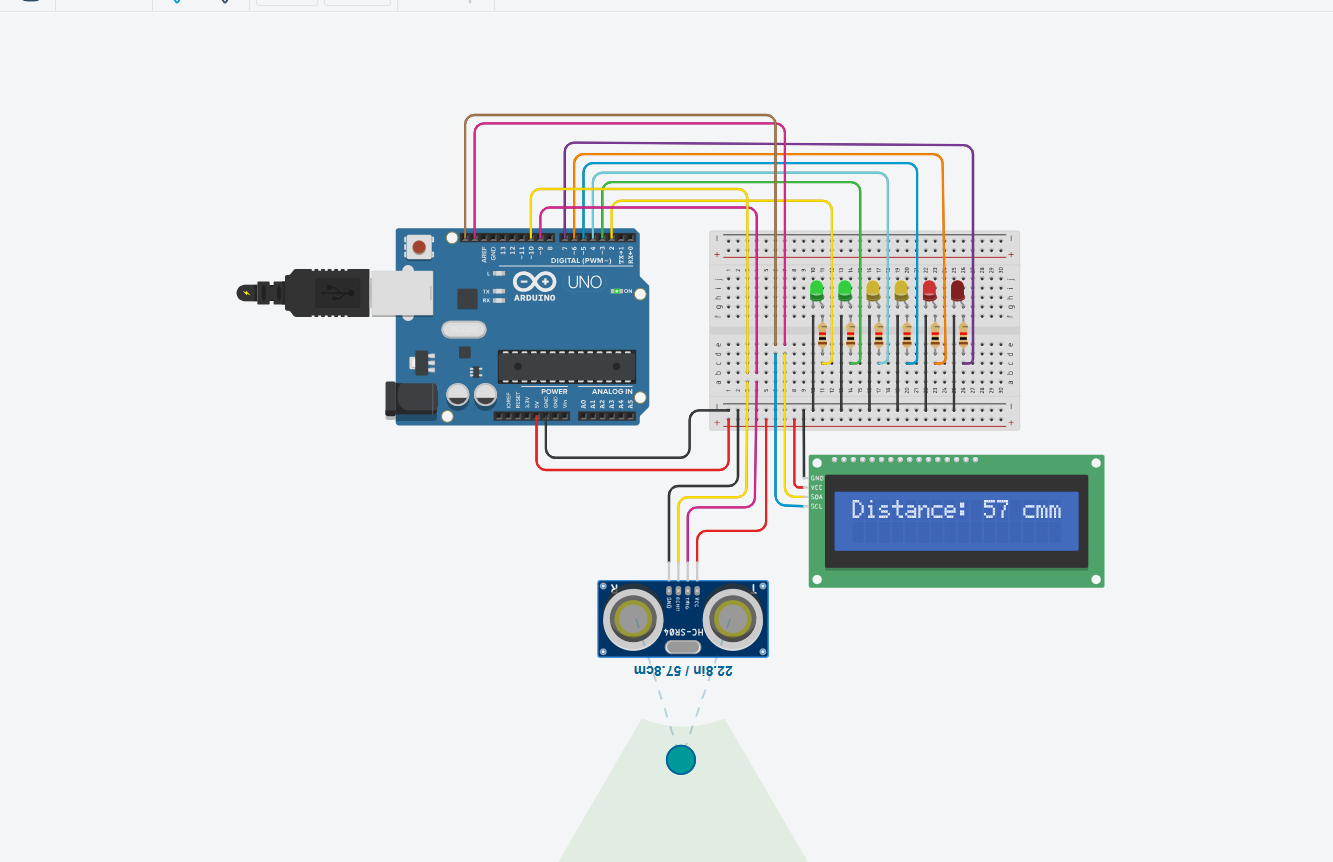
Wiring Diagram
| HC-SR04 Pin | Connects to Arduino |
|---|---|
| VCC | 5V |
| GND | GND |
| TRIG | Pin 9 |
| ECHO | Pin 10 |
| I2C LCD Pin | Connects to Arduino |
|---|---|
| GND | GND |
| VCC | 5V |
| SDA | A4 |
| SCL | A5 |
LEDs: Connect to digital pins D2 through D7 (or D8 if using 7 LEDs), each in series with a 220Ω resistor.

Arduino Code
#include <Wire.h>
#include <LiquidCrystal_I2C.h>

const int trigPin = 9;
const int echoPin = 10;
const int ledPins[] = {2, 3, 4, 5, 6, 7};
const int ledCount = sizeof(ledPins) / sizeof(ledPins[0]);

LiquidCrystal_I2C lcd(0x27, 16, 2);

void setup() {
  pinMode(trigPin, OUTPUT);
  pinMode(echoPin, INPUT);
  for (int i = 0; i < ledCount; i++) {
    pinMode(ledPins[i], OUTPUT);
  }
  lcd.init();
  lcd.backlight();
  lcd.setCursor(0, 0);
  lcd.print("Distance: ---- cm");
}

void loop() {
  long duration;
  int distance;

  digitalWrite(trigPin, LOW);
  delayMicroseconds(2);
  digitalWrite(trigPin, HIGH);
  delayMicroseconds(10);
  digitalWrite(trigPin, LOW);

  duration = pulseIn(echoPin, HIGH);
  distance = duration * 0.034 / 2; // Convert to cm

  // Display distance on LCD
  lcd.setCursor(10, 0);
  lcd.print("    "); // clear previous value
  lcd.setCursor(10, 0);
  lcd.print(distance);
  lcd.print(" cm");

  // Map distance (0–60 cm) to LED levels (0–6)
  int level = map(distance, 0, 300, ledCount, 0);
  level = constrain(level, 0, ledCount);

  for (int i = 0; i < ledCount; i++) {
    digitalWrite(ledPins[i], i < level ? HIGH : LOW);
  }

  delay(200);
}
Ultrasonic Distance Meter with LED and LCD
This project combines an ultrasonic sensor with a 6-LED bar and an I2C LCD to create a distance meter. As the object moves closer or farther, LEDs light up accordingly and distance is displayed on-screen.
Step 1: Include libraries and define pins
#include <Wire.h>
#include <LiquidCrystal_I2C.h>

const int trigPin = 9;
const int echoPin = 10;
const int ledPins[] = {2, 3, 4, 5, 6, 7};
const int ledCount = sizeof(ledPins) / sizeof(ledPins[0]);

LiquidCrystal_I2C lcd(0x27, 16, 2);
– trigPin and echoPin are connected to the ultrasonic sensor.
– ledPins[] defines the pins for the LED bar.
– lcd is a 16×2 I2C LCD for displaying distance.
Step 2: Setup all pins and LCD
void setup() {
  pinMode(trigPin, OUTPUT);
  pinMode(echoPin, INPUT);
  for (int i = 0; i < ledCount; i++) {
    pinMode(ledPins[i], OUTPUT);
  }
  lcd.init();
  lcd.backlight();
  lcd.setCursor(0, 0);
  lcd.print("Distance: ---- cm");
}
– Initializes pins for the ultrasonic sensor and LEDs.
– Sets up the LCD and prints a placeholder text on the first row.
Step 3: Measure distance using ultrasonic sensor
digitalWrite(trigPin, LOW);
delayMicroseconds(2);
digitalWrite(trigPin, HIGH);
delayMicroseconds(10);
digitalWrite(trigPin, LOW);

long duration = pulseIn(echoPin, HIGH);
int distance = duration * 0.034 / 2;
– Sends a 10μs pulse to the ultrasonic sensor.
– Uses pulseIn() to measure the time it takes for the echo.
– Converts the result to distance in centimeters.
Step 4: Show distance on LCD
lcd.setCursor(10, 0);
lcd.print("    ");
lcd.setCursor(10, 0);
lcd.print(distance);
lcd.print(" cm");
– Clears the old value and updates the LCD with the new distance reading.
Step 5: Map distance to LED levels
int level = map(distance, 0, 300, ledCount, 0);
level = constrain(level, 0, ledCount);
– Converts the distance range (0–300 cm) to LED levels (6–0).
– Closer = more LEDs lit. Farther = fewer LEDs.
– constrain() keeps the LED level within a safe range.
Step 6: Light up LEDs based on distance
for (int i = 0; i < ledCount; i++) {
  digitalWrite(ledPins[i], i < level ? HIGH : LOW);
}
– Lights up LEDs based on how close the object is.
– All off = far. All on = close.
Step 7: Add delay to smooth reading
delay(200);
– Prevents rapid flickering of LEDs and LCD updates.
How It Works
- The HC-SR04 emits ultrasonic pulses and listens for their echo.
- The Arduino calculates the distance and shows it on a 16×2 LCD via I2C.
- Simultaneously, the distance is mapped to a number of LEDs to visually represent proximity.
- This makes for a powerful combo of visual and numeric feedback.
Optional Upgrades
- Add buzzer when object gets too close.
- Add RGB LED for multicolor visual alert.
- Combine with temperature reading for dual-environment monitoring.
🔧 Recommended Arduino Starter Kits for Beginners
If you’re just getting started with Arduino, these beginner-friendly kits will help you learn faster and avoid the headache of missing parts. They all include essential components like LEDs, resistors, jumper wires, and an Arduino-compatible board.
- Arduino Official Starter Kit
Includes a genuine Arduino UNO board, project book, and components for 15+ tutorials.
👉 Check it on Amazon - Elegoo UNO R3 Super Starter Kit
Affordable and packed with sensors, LEDs, motors, and wires — great value.
👉 View the Elegoo Kit - Freenove Ultimate Starter Kit
Includes 200+ components, an Arduino-compatible board, and 50+ example projects.
👉 See the Freenove Kit
💡 Tip: Choose a kit with a good variety of components so you can build multiple projects without buying extra parts later.