Create an LED Chaser Effect with Arduino (Multiple LEDs + Button Control)
An LED chaser (also called LED running lights) is a popular beginner Arduino project where multiple LEDs light up one after the other, creating a chasing or bouncing visual effect. It’s a great way to learn about arrays, loops, timing, and now — adding button control to change direction.
In this guide, you’ll learn how to wire 6 LEDs and a button to control the direction of the LED chase.
Components Needed:
- Arduino Uno Starter Kit
- Bread Board
- Jumper Wires
- 5mm LEDs Assortment Pack
- Resistors ( 220 ohms recommended)
This post may contain affiliate links. If you purchase through these links, I may earn a small commission at no extra cost to you. It helps support this blog and keeps the projects coming—thanks for your support!
How It Works
Each LED is connected to a separate digital pin. We use a loop to turn on one LED at a time while turning off the others. A pushbutton is connected to toggle the direction of the chasing effect.
We use INPUT_PULLUP for the button — when pressed, it reads LOW. Each press toggles the direction between forward and backward.
Circuit Diagram
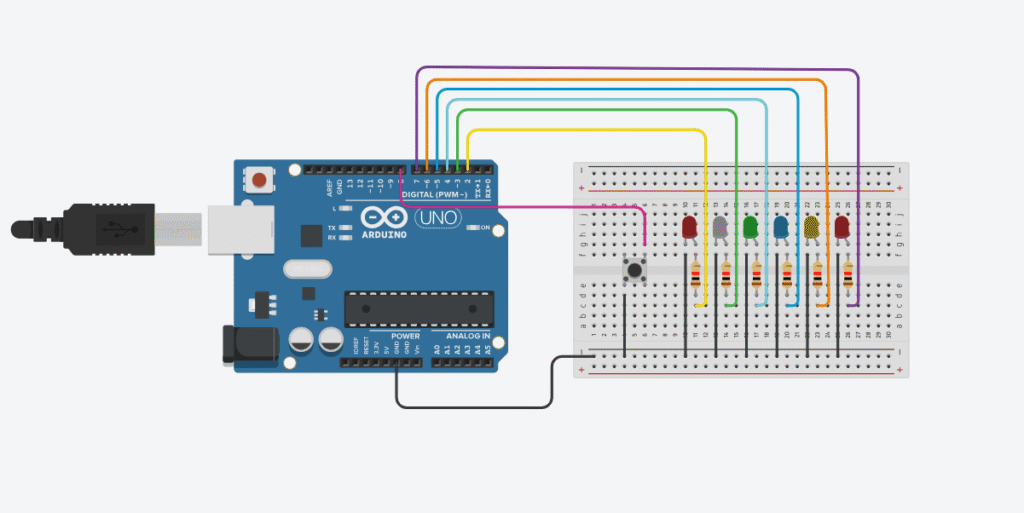
Wiring:
- LEDs:
- Anode (long leg) → 220Ω resistor → Arduino digital pins 2–7
- Cathode (short leg) → GND rail
- Button:
- One side → GND
- Other side → Arduino digital pin 8 (with
INPUT_PULLUPin code)
Arduino Code
const int ledCount = 6;
int ledPins[ledCount] = {2, 3, 4, 5, 6, 7};
const int buttonPin = 8;

int currentLED = 0;
unsigned long previousMillis = 0;
const unsigned long interval = 100;

bool autoRun = false;              // true if LED should run automatically
bool lastButtonState = HIGH;
unsigned long lastPressTime = 0;
int pressCount = 0;

void setup() {
  for (int i = 0; i < ledCount; i++) {
    pinMode(ledPins[i], OUTPUT);
    digitalWrite(ledPins[i], LOW); // ensure all LEDs off at start
  }
  pinMode(buttonPin, INPUT_PULLUP); // use internal pull-up resistor
}

void loop() {
  handleButton();  // check for hold or double-click

  bool buttonHeld = (digitalRead(buttonPin) == LOW); // true when button is held

  // Run LEDs if button is held or in auto mode
  if (autoRun || buttonHeld) {
    unsigned long currentMillis = millis();
    if (currentMillis - previousMillis >= interval) {
      previousMillis = currentMillis;

      // Turn off all LEDs
      for (int i = 0; i < ledCount; i++) {
        digitalWrite(ledPins[i], LOW);
      }

      // Turn on the current LED
      digitalWrite(ledPins[currentLED], HIGH);

      // Move to the next LED
      currentLED = (currentLED + 1) % ledCount;
    }
  } else {
    // If not holding and not auto-running → turn off all LEDs
    for (int i = 0; i < ledCount; i++) {
      digitalWrite(ledPins[i], LOW);
    }
  }
}

void handleButton() {
  bool currentState = digitalRead(buttonPin);

  // Detect button press (falling edge)
  if (currentState != lastButtonState) {
    if (currentState == LOW) {
      unsigned long now = millis();

      // Check for double click within 300ms
      if (now - lastPressTime < 300) {
        pressCount++;
        if (pressCount >= 2) {
          autoRun = !autoRun;    // toggle auto mode
          pressCount = 0;        // reset press counter
        }
      } else {
        pressCount = 1;          // start new click count
      }

      lastPressTime = now;
    }

    lastButtonState = currentState;
  }
}
Breaking Down the Code
Let’s go through the sketch step-by-step to understand how it works.
Step 1: Define constants and variables
const int ledCount = 6;
int ledPins[ledCount] = {2, 3, 4, 5, 6, 7};
const int buttonPin = 8;

int currentLED = 0;
unsigned long previousMillis = 0;
const unsigned long interval = 100;

bool autoRun = false;
bool lastButtonState = HIGH;
unsigned long lastPressTime = 0;
int pressCount = 0;
– ledPins[] stores the digital pins connected to LEDs (D2 to D7).
– buttonPin is connected to a pushbutton (D8).
– autoRun is a flag that enables auto-run mode.
– Other variables are used to track button state, time, and number of presses.
Step 2: Setup function
void setup() {
  for (int i = 0; i < ledCount; i++) {
    pinMode(ledPins[i], OUTPUT);
    digitalWrite(ledPins[i], LOW);
  }
  pinMode(buttonPin, INPUT_PULLUP);
}
The setup() function initializes all LED pins as outputs and ensures they start off.
The button pin is configured with INPUT_PULLUP to use Arduino’s internal pull-up resistor.
Step 3: Main loop
void loop() {
  handleButton();

  bool buttonHeld = (digitalRead(buttonPin) == LOW);

  if (autoRun || buttonHeld) {
    unsigned long currentMillis = millis();
    if (currentMillis - previousMillis >= interval) {
      previousMillis = currentMillis;

      for (int i = 0; i < ledCount; i++) {
        digitalWrite(ledPins[i], LOW);
      }

      digitalWrite(ledPins[currentLED], HIGH);
      currentLED = (currentLED + 1) % ledCount;
    }
  } else {
    for (int i = 0; i < ledCount; i++) {
      digitalWrite(ledPins[i], LOW);
    }
  }
}
– handleButton() checks if the button was held or double-clicked.
– If the button is held or auto mode is on, the LEDs will rotate every 100ms.
– Only one LED is on at a time, and the rest are turned off.
– If not in auto mode and the button is not pressed, all LEDs are off.
Step 4: Detect button press and toggle auto mode
void handleButton() {
  bool currentState = digitalRead(buttonPin);

  if (currentState != lastButtonState) {
    if (currentState == LOW) {
      unsigned long now = millis();

      if (now - lastPressTime < 300) {
        pressCount++;
        if (pressCount >= 2) {
          autoRun = !autoRun;
          pressCount = 0;
        }
      } else {
        pressCount = 1;
      }

      lastPressTime = now;
    }

    lastButtonState = currentState;
  }
}
The handleButton() function detects a double-click (within 300ms):
– When a double-click is detected, autoRun toggles on or off.
– lastButtonState helps prevent repeated triggers from the same press.
Test It Out
- Upload the code to your Arduino
- Press the button → chase direction changes (left-to-right or right-to-left)
- Each press toggles the direction
Tips & Variations
- Add a second button to pause/resume the effect
- Use a potentiometer to control speed
- Store direction in EEPROM to remember it after power off
What’s Next?
- Try adding RGB LEDs or Neopixels for advanced effects
- Combine with sensors (like light or distance) to make the chase interactive
- Build this into a prop, sign, or decoration
This LED chaser with direction control gives you a flexible, interactive light animation — perfect for learning, experimenting, and building more complex behaviors!
🔧 Recommended Arduino Starter Kits for Beginners
If you’re just getting started with Arduino, these beginner-friendly kits will help you learn faster and avoid the headache of missing parts. They all include essential components like LEDs, resistors, jumper wires, and an Arduino-compatible board.
- Arduino Official Starter Kit
Includes a genuine Arduino UNO board, project book, and components for 15+ tutorials.
👉 Check it on Amazon - Elegoo UNO R3 Super Starter Kit
Affordable and packed with sensors, LEDs, motors, and wires — great value.
👉 View the Elegoo Kit - Freenove Ultimate Starter Kit
Includes 200+ components, an Arduino-compatible board, and 50+ example projects.
👉 See the Freenove Kit
💡 Tip: Choose a kit with a good variety of components so you can build multiple projects without buying extra parts later.