Physical Address
304 North Cardinal St.
Dorchester Center, MA 02124
Physical Address
304 North Cardinal St.
Dorchester Center, MA 02124


In this project, you’ll learn how to control a multi-LED chaser effect using just one button. This tutorial covers how to:
It’s a fun way to explore INPUT_PULLUP, button debouncing, and LED animations — all with clean, beginner-friendly code.
This post may contain affiliate links. If you purchase through these links, I may earn a small commission at no extra cost to you. It helps support this blog and keeps the projects coming—thanks for your support!
The LED chaser moves from left to right, turning on one LED at a time. You can control it in two ways:
Clicking the button twice again disables auto-run mode and turns off all LEDs.
The code uses:
millis() for non-blocking LED timingINPUT_PULLUP to simplify button wiring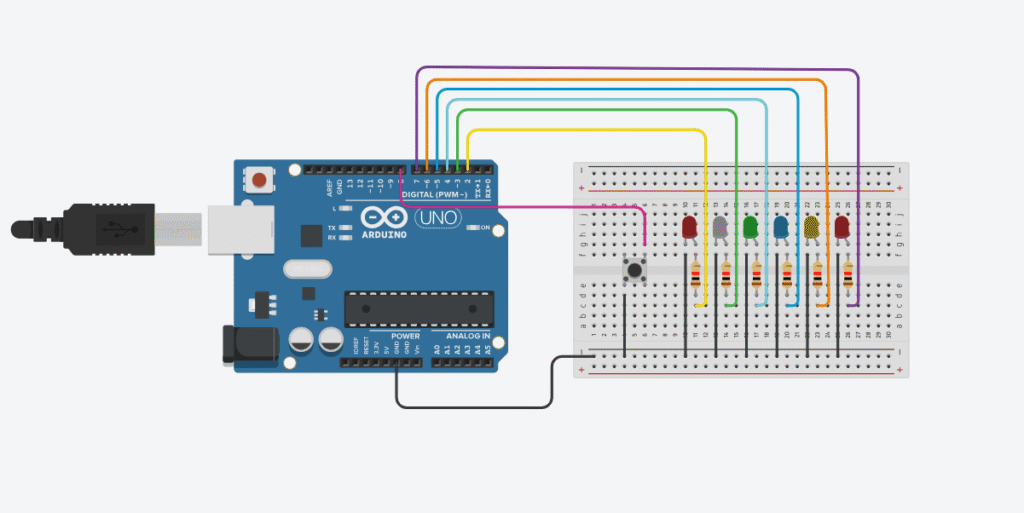
Note: No external resistor needed because we’re using INPUT_PULLUP.
const int ledCount = 6;
int ledPins[ledCount] = {2, 3, 4, 5, 6, 7};
const int buttonPin = 8;

int currentLED = 0;
unsigned long previousMillis = 0;
const unsigned long interval = 100;

bool autoRun = false;              // true if LED should run automatically
bool lastButtonState = HIGH;
unsigned long lastPressTime = 0;
int pressCount = 0;

void setup() {
  for (int i = 0; i < ledCount; i++) {
    pinMode(ledPins[i], OUTPUT);
    digitalWrite(ledPins[i], LOW); // ensure all LEDs off at start
  }
  pinMode(buttonPin, INPUT_PULLUP); // use internal pull-up resistor
}

void loop() {
  handleButton();  // check for hold or double-click

  bool buttonHeld = (digitalRead(buttonPin) == LOW); // true when button is held

  // Run LEDs if button is held or in auto mode
  if (autoRun || buttonHeld) {
    unsigned long currentMillis = millis();
    if (currentMillis - previousMillis >= interval) {
      previousMillis = currentMillis;

      // Turn off all LEDs
      for (int i = 0; i < ledCount; i++) {
        digitalWrite(ledPins[i], LOW);
      }

      // Turn on the current LED
      digitalWrite(ledPins[currentLED], HIGH);

      // Move to the next LED
      currentLED = (currentLED + 1) % ledCount;
    }
  } else {
    // If not holding and not auto-running → turn off all LEDs
    for (int i = 0; i < ledCount; i++) {
      digitalWrite(ledPins[i], LOW);
    }
  }
}

void handleButton() {
  bool currentState = digitalRead(buttonPin);

  // Detect button press (falling edge)
  if (currentState != lastButtonState) {
    if (currentState == LOW) {
      unsigned long now = millis();

      // Check for double click within 300ms
      if (now - lastPressTime < 300) {
        pressCount++;
        if (pressCount >= 2) {
          autoRun = !autoRun;    // toggle auto mode
          pressCount = 0;        // reset press counter
        }
      } else {
        pressCount = 1;          // start new click count
      }

      lastPressTime = now;
    }

    lastButtonState = currentState;
  }
}
Let’s go through the sketch step-by-step to understand how it works.
const int ledCount = 6;
int ledPins[ledCount] = {2, 3, 4, 5, 6, 7};
const int buttonPin = 8;

int currentLED = 0;
unsigned long previousMillis = 0;
const unsigned long interval = 100;

bool autoRun = false;              // true if LED should run automatically
bool lastButtonState = HIGH;
unsigned long lastPressTime = 0;
int pressCount = 0;
– ledPins[] stores the digital pins connected to LEDs (D2 to D7).
– buttonPin is connected to a pushbutton (D8).
– autoRun is a flag that enables auto-run mode.
– Other variables are used to track button state, time, and number of presses.
void setup() {
  for (int i = 0; i < ledCount; i++) {
    pinMode(ledPins[i], OUTPUT);
    digitalWrite(ledPins[i], LOW); // ensure all LEDs off at start
  }
  pinMode(buttonPin, INPUT_PULLUP); // use internal pull-up resistor
}
Initializes all LED pins as OUTPUT and sets them LOW. The button pin is set to INPUT_PULLUP so that pressing it brings the value to LOW.
void loop() {
  handleButton();  // check for hold or double-click

  bool buttonHeld = (digitalRead(buttonPin) == LOW); // true when button is held

  if (autoRun || buttonHeld) {
    unsigned long currentMillis = millis();
    if (currentMillis - previousMillis >= interval) {
      previousMillis = currentMillis;

      for (int i = 0; i < ledCount; i++) {
        digitalWrite(ledPins[i], LOW);
      }

      digitalWrite(ledPins[currentLED], HIGH);
      currentLED = (currentLED + 1) % ledCount;
    }
  } else {
    for (int i = 0; i < ledCount; i++) {
      digitalWrite(ledPins[i], LOW);
    }
  }
}
This function is called continuously. If autoRun is enabled or the button is held, it updates the current LED every 100ms. If not, it ensures all LEDs are off.
void handleButton() {
  bool currentState = digitalRead(buttonPin);

  if (currentState != lastButtonState) {
    if (currentState == LOW) {
      unsigned long now = millis();

      if (now - lastPressTime < 300) {
        pressCount++;
        if (pressCount >= 2) {
          autoRun = !autoRun;
          pressCount = 0;
        }
      } else {
        pressCount = 1;
      }

      lastPressTime = now;
    }

    lastButtonState = currentState;
  }
}
Detects a double-click on the button. If the user presses the button twice within 300 milliseconds, it toggles the autoRun flag on or off.
This project is perfect for building your button-handling skills and getting comfortable with non-blocking timing using millis().
Enjoy building it — and happy tinkering! 🔧✨
If you’re just getting started with Arduino, these beginner-friendly kits will help you learn faster and avoid the headache of missing parts. They all include essential components like LEDs, resistors, jumper wires, and an Arduino-compatible board.
💡 Tip: Choose a kit with a good variety of components so you can build multiple projects without buying extra parts later.