Physical Address
304 North Cardinal St.
Dorchester Center, MA 02124
Physical Address
304 North Cardinal St.
Dorchester Center, MA 02124

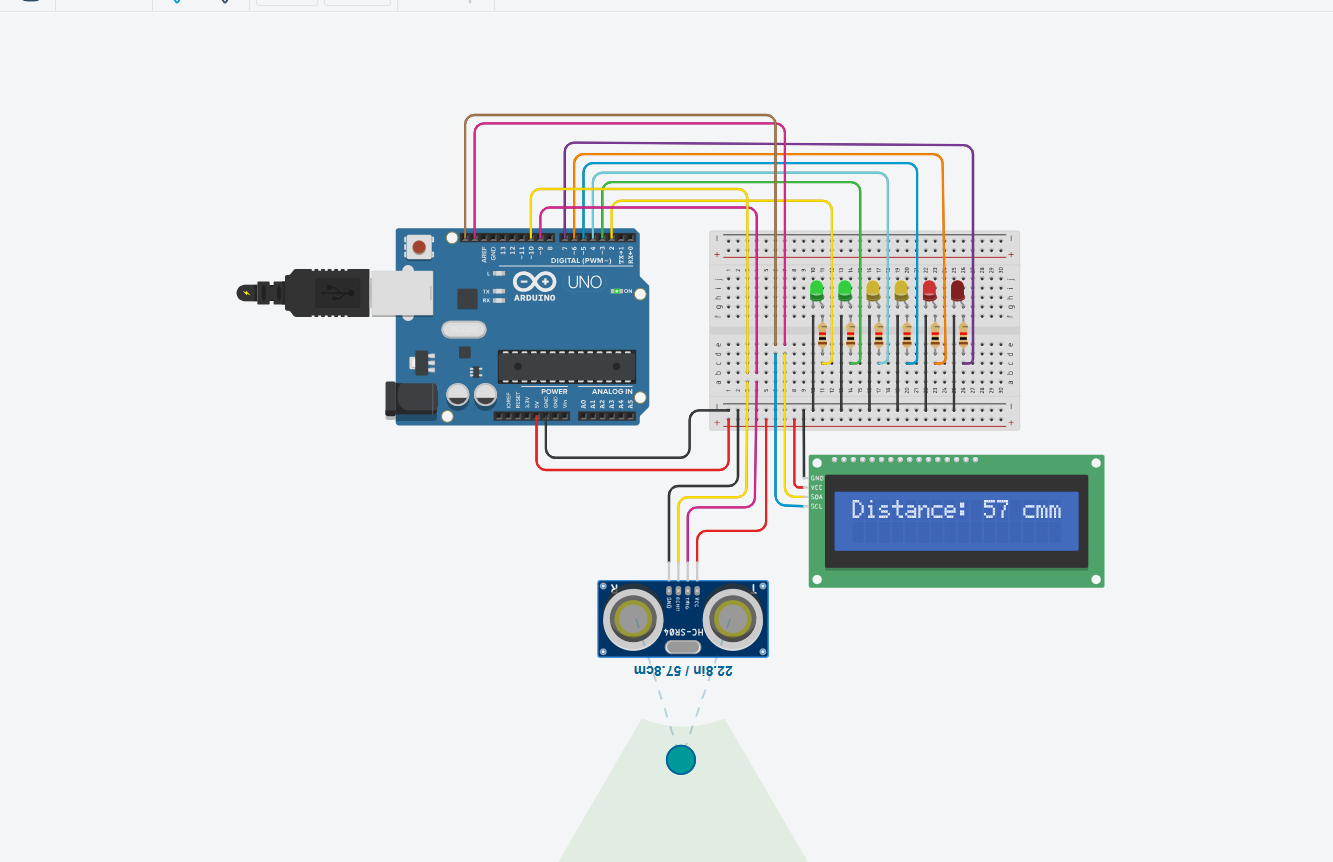
Want to visualize how close something is using just LEDs? In this project, we’ll use an HC-SR04 ultrasonic sensor to light up a row of LEDs based on distance — the closer the object gets, the more LEDs light up. We’ll also display the measured distance on a 16×2 I2C LCD screen.
This post may contain affiliate links. If you purchase through these links, I may earn a small commission at no extra cost to you. It helps support this blog and keeps the projects coming—thanks for your support!
| HC-SR04 Pin | Connects to Arduino |
|---|---|
| VCC | 5V |
| GND | GND |
| TRIG | Pin 9 |
| ECHO | Pin 10 |
| I2C LCD Pin | Connects to Arduino |
|---|---|
| GND | GND |
| VCC | 5V |
| SDA | A4 |
| SCL | A5 |
LEDs: Connect to digital pins D2 through D7 (or D8 if using 7 LEDs), each in series with a 220Ω resistor.

#include <Wire.h>
#include <LiquidCrystal_I2C.h>

const int trigPin = 9;
const int echoPin = 10;
const int ledPins[] = {2, 3, 4, 5, 6, 7};
const int ledCount = sizeof(ledPins) / sizeof(ledPins[0]);

LiquidCrystal_I2C lcd(0x27, 16, 2);

void setup() {
  pinMode(trigPin, OUTPUT);
  pinMode(echoPin, INPUT);
  for (int i = 0; i < ledCount; i++) {
    pinMode(ledPins[i], OUTPUT);
  }
  lcd.init();
  lcd.backlight();
  lcd.setCursor(0, 0);
  lcd.print("Distance: ---- cm");
}

void loop() {
  long duration;
  int distance;

  digitalWrite(trigPin, LOW);
  delayMicroseconds(2);
  digitalWrite(trigPin, HIGH);
  delayMicroseconds(10);
  digitalWrite(trigPin, LOW);

  duration = pulseIn(echoPin, HIGH);
  distance = duration * 0.034 / 2; // Convert to cm

  // Display distance on LCD
  lcd.setCursor(10, 0);
  lcd.print("    "); // clear previous value
  lcd.setCursor(10, 0);
  lcd.print(distance);
  lcd.print(" cm");

  // Map distance (0–60 cm) to LED levels (0–6)
  int level = map(distance, 0, 300, ledCount, 0);
  level = constrain(level, 0, ledCount);

  for (int i = 0; i < ledCount; i++) {
    digitalWrite(ledPins[i], i < level ? HIGH : LOW);
  }

  delay(200);
}
This project combines an ultrasonic sensor with a 6-LED bar and an I2C LCD to create a distance meter. As the object moves closer or farther, LEDs light up accordingly and distance is displayed on-screen.
#include <Wire.h>
#include <LiquidCrystal_I2C.h>

const int trigPin = 9;
const int echoPin = 10;
const int ledPins[] = {2, 3, 4, 5, 6, 7};
const int ledCount = sizeof(ledPins) / sizeof(ledPins[0]);

LiquidCrystal_I2C lcd(0x27, 16, 2);
– trigPin and echoPin are connected to the ultrasonic sensor.
– ledPins[] defines the pins for the LED bar.
– lcd is a 16×2 I2C LCD for displaying distance.
void setup() {
  pinMode(trigPin, OUTPUT);
  pinMode(echoPin, INPUT);
  for (int i = 0; i < ledCount; i++) {
    pinMode(ledPins[i], OUTPUT);
  }
  lcd.init();
  lcd.backlight();
  lcd.setCursor(0, 0);
  lcd.print("Distance: ---- cm");
}
– Initializes pins for the ultrasonic sensor and LEDs.
– Sets up the LCD and prints a placeholder text on the first row.
digitalWrite(trigPin, LOW);
delayMicroseconds(2);
digitalWrite(trigPin, HIGH);
delayMicroseconds(10);
digitalWrite(trigPin, LOW);

long duration = pulseIn(echoPin, HIGH);
int distance = duration * 0.034 / 2;
– Sends a 10μs pulse to the ultrasonic sensor.
– Uses pulseIn() to measure the time it takes for the echo.
– Converts the result to distance in centimeters.
lcd.setCursor(10, 0);
lcd.print("    ");
lcd.setCursor(10, 0);
lcd.print(distance);
lcd.print(" cm");
– Clears the old value and updates the LCD with the new distance reading.
int level = map(distance, 0, 300, ledCount, 0);
level = constrain(level, 0, ledCount);
– Converts the distance range (0–300 cm) to LED levels (6–0).
– Closer = more LEDs lit. Farther = fewer LEDs.
– constrain() keeps the LED level within a safe range.
for (int i = 0; i < ledCount; i++) {
  digitalWrite(ledPins[i], i < level ? HIGH : LOW);
}
– Lights up LEDs based on how close the object is.
– All off = far. All on = close.
delay(200);
– Prevents rapid flickering of LEDs and LCD updates.
If you’re just getting started with Arduino, these beginner-friendly kits will help you learn faster and avoid the headache of missing parts. They all include essential components like LEDs, resistors, jumper wires, and an Arduino-compatible board.
💡 Tip: Choose a kit with a good variety of components so you can build multiple projects without buying extra parts later.