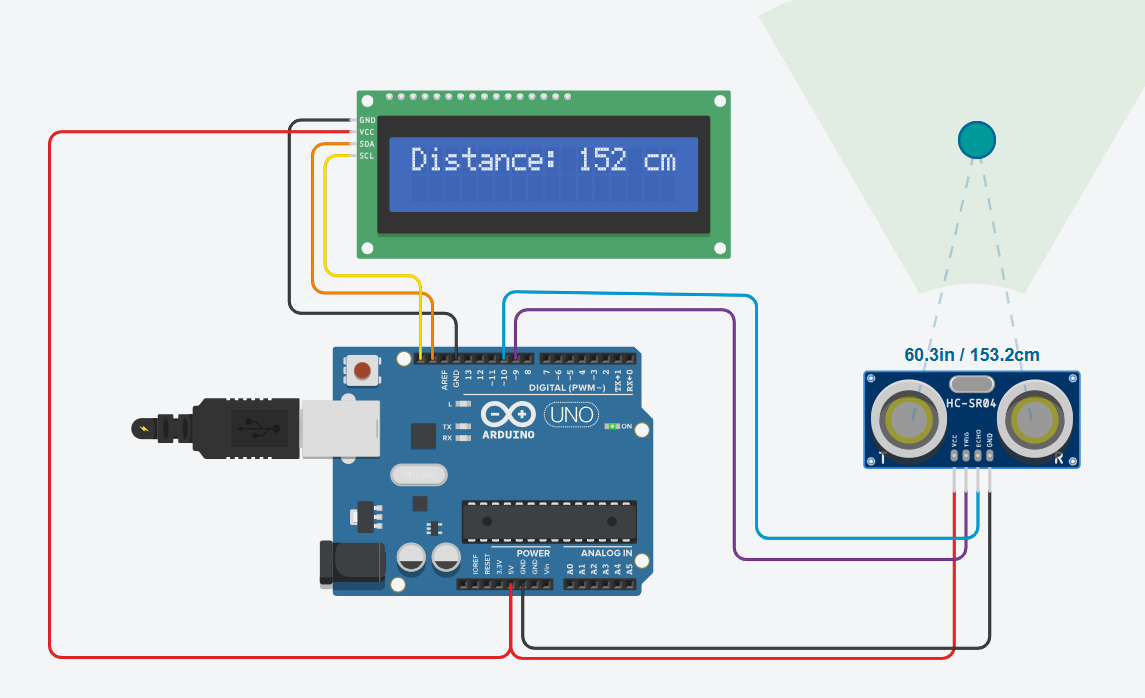
If you’re looking for a beginner-friendly way to get into sensing the physical world with Arduino, ultrasonic distance measurement is a fantastic place to start. In this project, we’ll use an HC-SR04 ultrasonic sensor to measure how far away an object is — and we’ll display that distance on a 16×2 I2C LCD screen. Whether you’re building a robot that needs to avoid obstacles or a smart parking sensor, this setup is the foundation for a wide range of practical applications.
Let’s walk through it step-by-step and understand not just how to build it — but how it really works.
This project teaches you how to interface with a common ultrasonic sensor using just two digital pins on your Arduino. You’ll learn how to calculate distance based on the time it takes for a sound pulse to bounce off an object and return. Then we’ll take that data and output it to an I2C-connected LCD so you can see your measurements in real time.
It’s one of those perfect beginner projects that ties together inputs, outputs, and simple math — giving you immediate visual feedback every time you move your hand in front of the sensor.
How It Works
The HC-SR04 sensor works a lot like echolocation in bats. It sends out a high-frequency sound pulse using the Trig pin. When that pulse hits an object, it bounces back and is picked up by the Echo pin. The Arduino measures the time between sending and receiving the pulse using the pulseIn() function.
Since we know the speed of sound in air (about 343 m/s), we can use the time delay to calculate the distance to the object. But because the sound wave travels to the object and then back, we divide the result by two. The final formula looks like this:
Long distance = (duration / 2) / 29.1
This converts the time into centimeters, assuming the speed of sound is approximately 29.1 microseconds per centimeter.
The LCD shows the current distance reading, updating every second, so you can watch it respond as you move your hand closer or farther from the sensor.
Wiring Guide
Let’s wire it up the right way so everything works smoothly.
Start with the HC-SR04 ultrasonic sensor. Connect the VCC pin to the Arduino’s 5V, and the GND to GND. The Trig pin should go to digital pin 9, and the Echo pin to digital pin 10.

Next, connect your I2C LCD. These displays only use two data wires: SDA and SCL. On an Arduino Uno, SDA is A4 and SCL is A5. As always, connect VCC to 5V and GND to GND.
Once everything is in place, you’re ready to upload the code and start measuring distance.
The Code Explained
Here’s the complete code for this project:
#include <LiquidCrystal_I2C.h>

LiquidCrystal_I2C lcd(0x27, 16, 2);  // Set LCD I2C address and dimensions

const int trigPin = 9;   // Send signal
const int echoPin = 10;  // Receive signal

void setup() {
  lcd.init();            // Initialize LCD
  lcd.backlight();       // Turn on LCD backlight
  pinMode(trigPin, OUTPUT);
  pinMode(echoPin, INPUT);
}

void loop() {
  digitalWrite(trigPin, LOW);
  delayMicroseconds(2);              // Clear the trig pin
  digitalWrite(trigPin, HIGH);       // Send 10 microsecond pulse
  delayMicroseconds(10);
  digitalWrite(trigPin, LOW);

  long duration = pulseIn(echoPin, HIGH);       // Time for echo to return
  long distance = (duration / 2) / 29.1;         // Convert to cm

  lcd.clear();
  lcd.setCursor(0, 0);
  lcd.print("Distance: ");
  lcd.print(distance);
  lcd.print(" cm");

  delay(1000);  // Update once per second
}
Let’s go over the key sections of the code in a bit more detail so everything is crystal clear, even if this is your first time working with sensors or displays.
We begin by importing the LiquidCrystal_I2C library, which simplifies communication between the Arduino and the LCD over the I2C interface. The line LiquidCrystal_I2C lcd(0x27, 16, 2); creates an LCD object with the I2C address 0x27 and a screen size of 16 columns by 2 rows. If your LCD doesn’t work at this address, don’t worry — it might use 0x3F, and you can find out by running an I2C scanner sketch.
Next, we define the Trig and Echo pins that connect to the ultrasonic sensor. The trigger pin is used to send out a high-frequency sound pulse, and the echo pin listens for the reflection.
In the setup() function, we initialize the LCD with lcd.init() and turn on the backlight using lcd.backlight(). We also set trigPin as an output and echoPin as an input using pinMode().
In the loop(), we send a pulse to the sensor by briefly setting the trigPin low, then high for exactly 10 microseconds, then low again. This triggers the sensor to emit an ultrasonic pulse. Immediately after that, we call pulseIn(echoPin, HIGH) to measure how long it takes for the reflected pulse to return. This time duration is what we’ll use to calculate distance.
The formula (duration / 2) / 29.1 takes the round-trip time, halves it (because the wave travels to the object and back), and then converts the result to centimeters. That’s based on the fact that sound travels roughly 29.1 microseconds per centimeter in air.
We then clear the LCD and print the calculated distance. The lcd.setCursor(0, 0) ensures the message always starts at the top-left corner. Finally, we use delay(1000) to update the reading once per second. This pacing keeps the output readable and gives the sensor a bit of breathing room between measurements.
If your LCD screen doesn’t show anything at all, the most common reason is the wrong I2C address. Try changing 0x27 to 0x3F in the code. If you’re still not sure, run an I2C scanner sketch to detect the correct address.
If your distance readings are jumpy or inaccurate, make sure the wires are secure, avoid overly reflective or noisy environments, and if needed, add a capacitor between VCC and GND on the sensor.
Also, always double-check that all grounds (Arduino, LCD, and sensor) are tied together. That one mistake can ruin everything.
❓ Frequently Asked Questions (FAQ)
Q: Can I use this to detect water levels or liquid surfaces?
Yes, though ultrasonic waves reflect better off solid objects. Some sensors are waterproof (like JSN-SR04T) for liquid-level applications.
Q: How accurate is this setup?
Accuracy is typically within 2–3mm under ideal conditions. For better precision, average multiple readings and filter noise.
Q: Can I display the result in inches instead of centimeters?
Absolutely. Just change the formula to divide by 74 instead of 29.1.
Q: What’s the minimum and maximum range?
The HC-SR04 works best between 2 cm and 400 cm (4 meters).
🛒 Recommended Components (Affiliate Links)
If you want to build this exact project, here are the parts I personally recommend:
10kΩ Potentiometer (Knob included)
If you purchase through these links, I may earn a small commission — at no extra cost to you. It’s a great way to support this blog and help me keep writing helpful tutorials.
Project Extensions
Once you’ve got this working, you can take it further. Try adding a buzzer that beeps faster as you get closer to an object, or connect an LED bar graph to show proximity visually.
You could also mount the sensor on a servo and scan the area like a radar. Combine that with some logic, and you’ve got the foundation of an obstacle-avoiding robot.
Want to log distance data? Add an SD card module and save measurements for later analysis.
The possibilities are endless once you understand the basics — and now, you do.