Controlling an LED with a pushbutton is one of the best starting points when learning Arduino. In this tutorial, you’ll learn how to wire a simple circuit and write basic code that lets you turn an LED on and off using a single button.
It’s simple, fast to build, and teaches you two key Arduino functions: digitalRead() and digitalWrite().
Components Needed:
- Arduino Uno Starter Kit
- Bread Board
- Jumper Wires
- 5mm LEDs Assortment Pack
- Resistors ( 220 ohms recommended)
This post may contain affiliate links. If you purchase through these links, I may earn a small commission at no extra cost to you. It helps support this blog and keeps the projects coming—thanks for your support!
How It Works
We connect a pushbutton to a digital pin, and use Arduino’s built-in INPUT_PULLUP feature. That way, we don’t need an external resistor — the pin reads HIGH when the button is not pressed, and LOW when it is.
When the button is pressed, the LED turns ON. When released, it turns OFF.
This logic is useful in many real-life electronics applications — like triggering an event when a door is opened, starting a timer, or turning on a device only when a physical button is pressed.
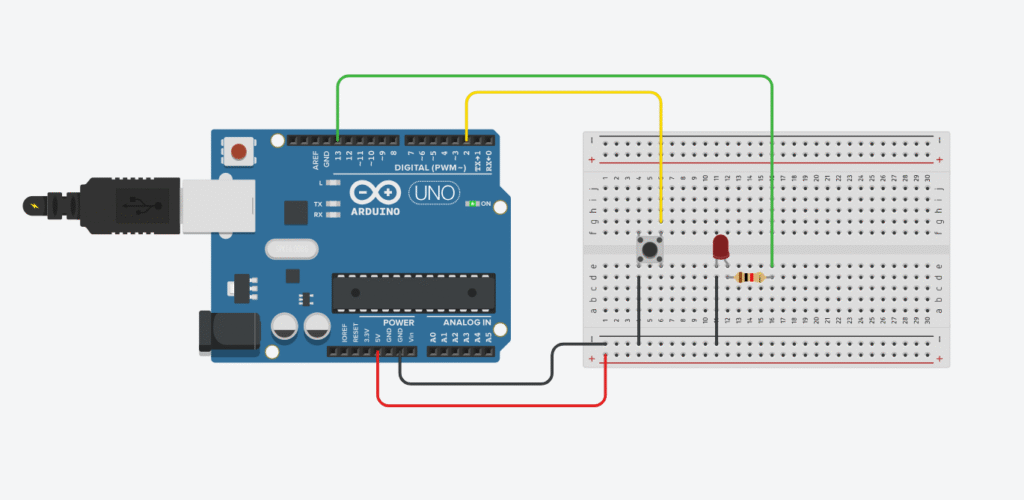
Circuit Diagram
Wiring:
- LED:
- Anode (long leg) → 220Ω resistor → Digital pin 13
- Cathode (short leg) → GND
- Button:
- One side → GND
- Other side → Digital pin 2
Note: Since we’re using INPUT_PULLUP, the logic is inverted (LOW = pressed).
You can also simulate this circuit using Tinkercad Circuits if you don’t have the hardware yet. It’s a great way to test your setup without soldering or real components.
Arduino Code
const int ledPin = 13;
const int buttonPin = 2;

void setup() {
  pinMode(ledPin, OUTPUT);
  pinMode(buttonPin, INPUT_PULLUP); // internal pull-up enabled
}

void loop() {
  int buttonState = digitalRead(buttonPin);

  if (buttonState == LOW) {
    digitalWrite(ledPin, HIGH); // LED ON
  } else {
    digitalWrite(ledPin, LOW); // LED OFF
  }
}
Test It Out
- Upload the code to your Arduino board
- Press the button → the LED lights up
- Release it → LED turns off
Simple as that! This logic can be reused in countless future projects — controlling motors, triggering buzzers, starting sequences, and more.
Troubleshooting
- If the LED doesn’t turn on, check:
- LED orientation (long vs short leg)
- Resistor placement
- Button orientation — make sure it’s placed across the breadboard’s center gap
- Use Serial.print(buttonState)for debugging if needed
💡 Tip: If you want the LED to turn ON when the button is not pressed, just flip the logic in the if statement.
What’s Next?
- Turn the button into a toggle switch (on/off with each press)
- Add a second button to control another LED
- Use the button to trigger a servo or start a timer
Once you master reading buttons, the rest of Arduino becomes 10x more fun 🔥
Stay curious, and keep building!
🔧 Recommended Arduino Starter Kits for Beginners
If you’re just getting started with Arduino, these beginner-friendly kits will help you learn faster and avoid the headache of missing parts. They all include essential components like LEDs, resistors, jumper wires, and an Arduino-compatible board.
- Arduino Official Starter Kit
Includes a genuine Arduino UNO board, project book, and components for 15+ tutorials.
👉 Check it on Amazon - Elegoo UNO R3 Super Starter Kit
Affordable and packed with sensors, LEDs, motors, and wires — great value.
👉 View the Elegoo Kit - Freenove Ultimate Starter Kit
Includes 200+ components, an Arduino-compatible board, and 50+ example projects.
👉 See the Freenove Kit
💡 Tip: Choose a kit with a good variety of components so you can build multiple projects without buying extra parts later.