Physical Address
304 North Cardinal St.
Dorchester Center, MA 02124
Physical Address
304 North Cardinal St.
Dorchester Center, MA 02124

Have you just learned how to blink one LED with Arduino and you’re thinking… “Okay cool, now what?”
Well, how about we blink multiple LEDs like a pro?
In this post, I’ll show you how to connect and blink 3 LEDs using Arduino. You’ll learn how to wire them properly, write the code, and even tweak it for some cool effects. Let’s get started!
This post may contain affiliate links. If you purchase through these links, I may earn a small commission at no extra cost to you. It helps support this blog and keeps the projects coming—thanks for your support!
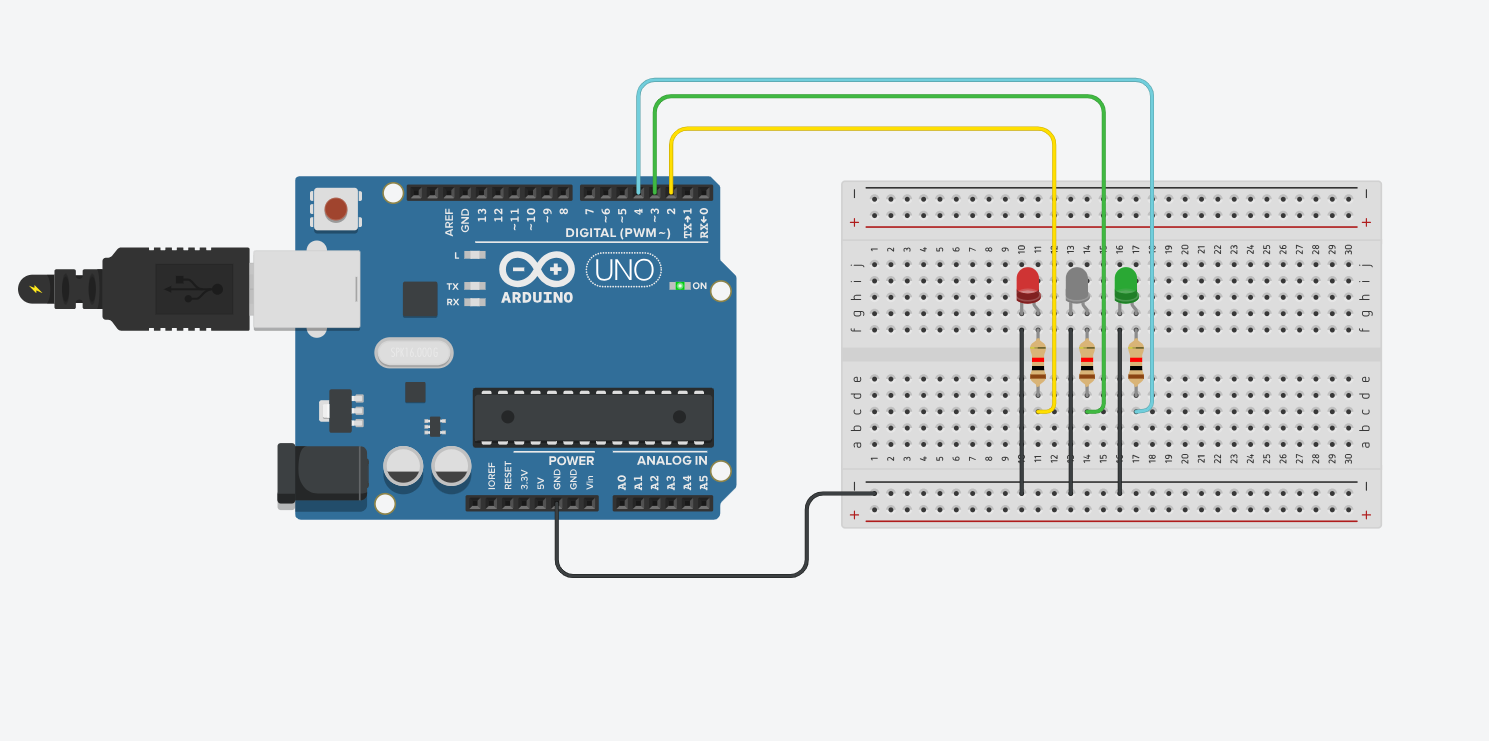
Each LED will be connected to a different digital pin on the Arduino. The longer leg (anode) goes to the digital pin via a resistor, and the shorter leg (cathode) goes to GND.
Always use resistors (220Ω is good) to prevent burning out the LEDs.
Here’s a simple sketch that turns on each LED one after another with a 500ms delay:
int led1 = 2;
int led2 = 3;
int led3 = 4;

void setup() {
  pinMode(led1, OUTPUT);
  pinMode(led2, OUTPUT);
  pinMode(led3, OUTPUT);
}

void loop() {
  digitalWrite(led1, HIGH);
  delay(500);
  digitalWrite(led1, LOW);

  digitalWrite(led2, HIGH);
  delay(500);
  digitalWrite(led2, LOW);

  digitalWrite(led3, HIGH);
  delay(500);
  digitalWrite(led3, LOW);
}
That’s it — now your LEDs will blink one after another, like a simple chaser effect.

No problem. Replace the loop() function with this:
void loop() {
  digitalWrite(led1, HIGH);
  digitalWrite(led2, HIGH);
  digitalWrite(led3, HIGH);
  delay(500);

  digitalWrite(led1, LOW);
  digitalWrite(led2, LOW);
  digitalWrite(led3, LOW);
  delay(500);
}
Boom — synchronized blinking like a squad
If you have 5, 10, or even 20 LEDs, you don’t want to write the same line over and over. Use an array:
int leds[] = {2, 3, 4, 5, 6}; // add as many as you want

void setup() {
  for (int i = 0; i < 5; i++) {
    pinMode(leds[i], OUTPUT);
  }
}

void loop() {
  for (int i = 0; i < 5; i++) {
    digitalWrite(leds[i], HIGH);
  }
  delay(500);
  for (int i = 0; i < 5; i++) {
    digitalWrite(leds[i], LOW);
  }
  delay(500);
}
Easy to scale. Easy to read. Your future self will thank you.
Now that you’ve nailed blinking multiple LEDs, try:
pinMode() in setup() → declare pins as OUTPUTdigitalWrite(pin, HIGH/LOW) to turn them on/offLearning how to blink multiple LEDs isn’t just a basic Arduino skill — it’s your first step toward creating full-blown light shows, smart lamps, or robot eyes
Start simple. Blink smart. Build epic.
If you’re just getting started with Arduino, these beginner-friendly kits will help you learn faster and avoid the headache of missing parts. They all include essential components like LEDs, resistors, jumper wires, and an Arduino-compatible board.
💡 Tip: Choose a kit with a good variety of components so you can build multiple projects without buying extra parts later.