Have you just learned how to blink one LED with Arduino and you’re thinking… “Okay cool, now what?”
Well, how about we blink multiple LEDs like a pro?
In this post, I’ll show you how to connect and blink 3 LEDs using Arduino. You’ll learn how to wire them properly, write the code, and even tweak it for some cool effects. Let’s get started!
What You’ll Need
- Arduino Uno Starter Kit
- Bread Board
- Jumper Wires
- 5mm LEDs Assortment Pack
- Resistors ( 220 ohms recommended)
This post may contain affiliate links. If you purchase through these links, I may earn a small commission at no extra cost to you. It helps support this blog and keeps the projects coming—thanks for your support!
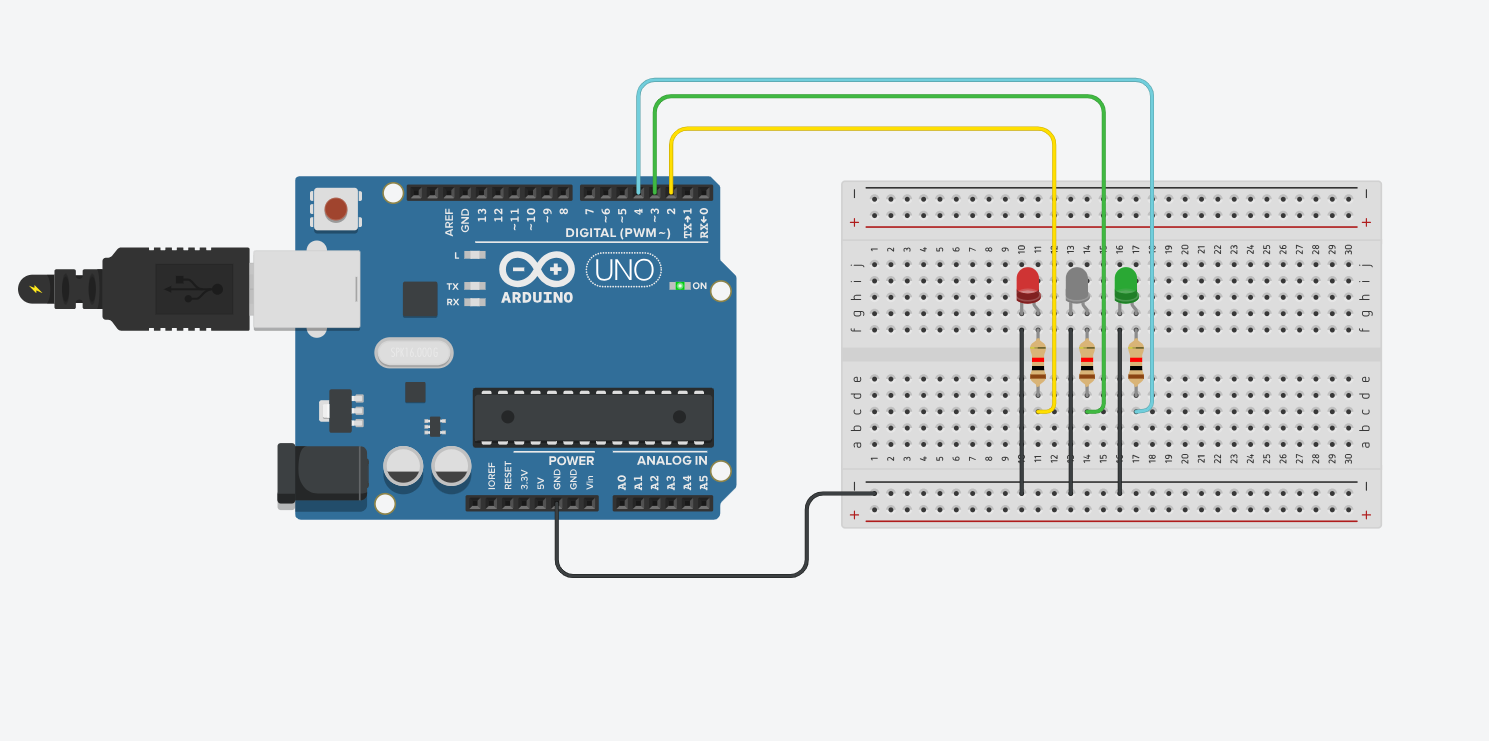
Wiring the LEDs
Each LED will be connected to a different digital pin on the Arduino. The longer leg (anode) goes to the digital pin via a resistor, and the shorter leg (cathode) goes to GND.
Pin Configuration:
- LED 1 → Pin 2
- LED 2 → Pin 3
- LED 3 → Pin 4
Always use resistors (220Ω is good) to prevent burning out the LEDs.
The Code
Here’s a simple sketch that turns on each LED one after another with a 500ms delay:
int led1 = 2;
int led2 = 3;
int led3 = 4;

void setup() {
  pinMode(led1, OUTPUT);
  pinMode(led2, OUTPUT);
  pinMode(led3, OUTPUT);
}

void loop() {
  digitalWrite(led1, HIGH);
  delay(500);
  digitalWrite(led1, LOW);

  digitalWrite(led2, HIGH);
  delay(500);
  digitalWrite(led2, LOW);

  digitalWrite(led3, HIGH);
  delay(500);
  digitalWrite(led3, LOW);
}
That’s it — now your LEDs will blink one after another, like a simple chaser effect.

Want All LEDs to Blink Together?
No problem. Replace the loop() function with this:
void loop() {
  digitalWrite(led1, HIGH);
  digitalWrite(led2, HIGH);
  digitalWrite(led3, HIGH);
  delay(500);

  digitalWrite(led1, LOW);
  digitalWrite(led2, LOW);
  digitalWrite(led3, LOW);
  delay(500);
}
Boom — synchronized blinking like a squad
Bonus: Use Arrays for Cleaner Code
If you have 5, 10, or even 20 LEDs, you don’t want to write the same line over and over. Use an array:
int leds[] = {2, 3, 4, 5, 6}; // add as many as you want

void setup() {
  for (int i = 0; i < 5; i++) {
    pinMode(leds[i], OUTPUT);
  }
}

void loop() {
  for (int i = 0; i < 5; i++) {
    digitalWrite(leds[i], HIGH);
  }
  delay(500);
  for (int i = 0; i < 5; i++) {
    digitalWrite(leds[i], LOW);
  }
  delay(500);
}
Easy to scale. Easy to read. Your future self will thank you.
What’s Next?
Now that you’ve nailed blinking multiple LEDs, try:
- Making a running LED animation (like Knight Rider)
- Blinking in random order
- Using button input to toggle LEDs
- Controlling them via Bluetooth or WiFi (ESP8266/ESP32)
Summary
- Each LED needs its own pin + resistor
pinMode()insetup()→ declare pins as OUTPUT- Use
digitalWrite(pin, HIGH/LOW)to turn them on/off - You can blink one by one or all together
- Arrays make life way easier with many LEDs
Final Thoughts
Learning how to blink multiple LEDs isn’t just a basic Arduino skill — it’s your first step toward creating full-blown light shows, smart lamps, or robot eyes
Start simple. Blink smart. Build epic.
🔧 Recommended Arduino Starter Kits for Beginners
If you’re just getting started with Arduino, these beginner-friendly kits will help you learn faster and avoid the headache of missing parts. They all include essential components like LEDs, resistors, jumper wires, and an Arduino-compatible board.
- Arduino Official Starter Kit
Includes a genuine Arduino UNO board, project book, and components for 15+ tutorials.
👉 Check it on Amazon - Elegoo UNO R3 Super Starter Kit
Affordable and packed with sensors, LEDs, motors, and wires — great value.
👉 View the Elegoo Kit - Freenove Ultimate Starter Kit
Includes 200+ components, an Arduino-compatible board, and 50+ example projects.
👉 See the Freenove Kit
💡 Tip: Choose a kit with a good variety of components so you can build multiple projects without buying extra parts later.