Physical Address
304 North Cardinal St.
Dorchester Center, MA 02124
Physical Address
304 North Cardinal St.
Dorchester Center, MA 02124

If you’re serious about soldering, keeping your soldering iron tip clean isn’t optional — it’s essential.
The tip is in constant contact with hot metal and solder, which makes it vulnerable to oxidation, rust, and metallic build-up. Over time, this can seriously reduce performance (and mess up your joints!).
Tips usually turn black after use. This means that the tip has undergone oxidation and has oxides deposited on its surface.
Cleaning the tip frequently by removing any dirt or dust will help keep it free from oxidation.
Make sure to clean it right away after each use to prevent corrosion or rust. Then, always re-tin your tip directly after cleaning to help protect it from further oxidation.
After a few uses, you’ll probably notice your soldering iron tip turning black or dull gray — a clear sign of oxidation and oxide buildup.
If left uncleaned, this layer will reduce the tip’s ability to transfer heat effectively and make it harder to apply solder.
Cleaning the tip regularly helps remove this buildup and keeps the soldering process smooth and efficient.
👉 That’s why you should clean it often and re-tin it after every cleaning to protect the surface and extend your tip’s lifespan.
Here are several ways to clean the soldering iron tip:
First, remember to TURN OFF your soldering iron and let it cool down for about 15–20 minutes before cleaning the tip. Once it’s cooled, you can safely start cleaning both the soldering iron and the tip without risking any burns. If you skip this step, you might end up smelling like BBQ — and trust me, you don’t want to be the main course.
One of the most common ways to clean a soldering tip is by using a sponge. Use a sulfur-free sponge specifically designed for soldering. Make sure it’s clean and free of dust or contaminants to avoid damaging the tip. Dampen the sponge slightly, then gently wipe the tip to remove any excess solder, dirt, or oxidation. (Don’t soak it like you’re washing dishes — just a little damp is enough.)
Because a wet sponge is much cooler than the soldering tip, it can cause thermal shock when they come into contact. This sudden change in temperature might damage the tip over time. To minimize this, you can use brass wool (or brass wire) instead of a sponge. It’s durable, effective at removing contaminants, and soft enough not to scratch the tip’s surface.
You can also use a tip cleaner (or tip tinner) to restore your soldering tip. This is a chemical paste that usually comes in a small metal tin. It’s specially designed to remove stubborn oxidation that regular cleaning methods (like sponge or brass wool) might miss. Just heat up your soldering iron, then dip or gently wipe the tip in the paste. Within seconds, your tip will be shiny again — like brand new.
A tip polisher can be used to maximize the cleaning of tip cleaners and tinners.
Another way to clean your soldering tip is by using a polishing bar.
This tool is great for removing heavy oxidation and surface contamination that other methods can’t handle.
👉 Important: Always re-tin the tip immediately after polishing to prevent it from oxidizing again.
When using a polishing bar, make sure the soldering iron is cool. Then, carefully scrape off the dark, oxidized layer.
You’ll start to see the shiny iron plating underneath — that’s your cue to stop.
If you’re new to soldering or just picked up your first soldering iron, you might not be familiar with how to properly take care of the tip.
One of the most common issues beginners face is rust and corrosion on the soldering tip.
But don’t worry — in this article, I’ll walk you through a few simple maintenance tips to help you keep your soldering tip in great condition, make your soldering sessions smoother, and avoid having to replace your tip too soon.
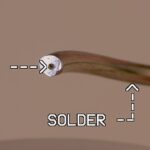
Tin your iron tip before and after you use it. A good thing for tinning is that the tip recovers conductivity and makes soldering a lot easier.
Apply solder to the tip
Roll the tip on a sponge
Properly tinned soldering iron tip.
Using highly activated rosin flux or acid-based flux can significantly reduce the lifespan of your soldering tip. These types of flux are more aggressive and can cause the tip to corrode faster. To extend the service life of your tip, it’s recommended to use iron-plated tips, which are more durable and resistant to wear and chemical damage.
The tip has a wettable area — the working surface that transfers heat. If the tip becomes unwettable (meaning solder won’t stick to it), you’ll need to apply flux and wipe the tip clean to restore its functionality.
Use a polishing bar if you need to file the tip or perform heavy-duty cleaning. It’s a safer option because excessive filing or using the wrong products can strip away the protective plating — which significantly shortens the tip’s lifespan. (Think of it like sanding too much paint off your car — looks clean but damages the layer that protects it.)
Before turning off the iron, do not remove the excess solder on your iron tip because this excess solder will prevent oxidation of the wettable surface if your iron tip.
Use distilled water to dampen your cleaning sponge, as tap water may contain minerals or impurities that can contaminate or damage your soldering tip over time.
7. After Using the Soldering Iron, Don’t Forget to:
Turn off the soldering iron and let the tip cool down.
While it’s still warm, carefully clean the tip with a damp sponge to remove any remaining solder or debris.
Apply a fresh coat of solder (re-tin) to protect the tip from oxidation.
Store the iron properly — either in a stand or tip-safe holder — to keep it clean and safe for the next use.
(Treat your soldering iron like a warrior after battle: clean it up, armor it, and let it rest 😎)